Maxi-Cosi Peri 180° Rotating Infant Car Seat
Maxi-Cosi Peri newborn fit
Rotating convertible and multimode car seats are taking up an increasing percentage of store shelves. Families seem to like the convenience of loading their child as the child faces them, then rotating the seat into the proper direction. The Maxi-Cosi Peri 180 joins a very small number of rear facing only car seats that also rotate. It’s plush, the carrier is easy to use and fits our doll models well, let’s see what else the Peri has to offer.
CSFTL Quick Stats
Weight range: 4–30 poundsHeight range: up to 32 inches tallLowest harness height: 7 inches with insertsHighest harness height: 11 inches without insertsExpiration: 8 years
Usage Requirement
When using the passenger and driver side locations, when possible, the car seat MUST be touching the back of the (vehicle) seat in front of it.Please see our Installation with the Base/Requirement about Touching the Vehicle Seatback section for our assessment of how this is pretty much impossibleThe manufacturer has clarified that this requirement can be a light touch, not bracing the seat back. In their testing, this requirement and using the light bracing did not affect the ability to use the rotation function as intended.
Measurements
Carrier weight: 8.8 pounds. Note: the manufacturer lists the carrier weight at just under 8 pounds, without canopy and inserts, which weigh approx. 1 poundBase weight: 15 poundsWidth at widest point: carrier alone, 17.5 inches, base, 19 inchesFront-to-back measurement with base: 28 inchesFront-to-back measurement carrier only:
Features
Carrier rotates when attaching it to the baseTension indicator on the baseNo rethread harness5 recline positionsGigantic, zip-out canopy designAdded ventilation in the shellLoad legAnti-rebound barPremium lower anchor connectorsPureCosi™ fabrics made without wool or added fire retardant treatmentVisible belt paths for secure, on-the-go installation without a base (Maxi-Cosi calls this taxi mode, please note that in our eyes, taxi mode would include either rigid lower anchors or Euro routing on the carrier)1-hand release from base (and stroller)
Getting the Seat Ready to Use
Maxi-Cosi Peri harness unboxing
The seat arrives fully assembled and mostly ready to use once it’s unpacked. Our seat did have a handful of extra packing materials tucked into different places but removing them was the main thing standing between me and using the seat.
Maxi-Cosi Peri harness unboxing
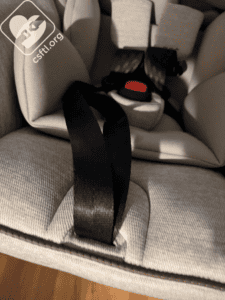
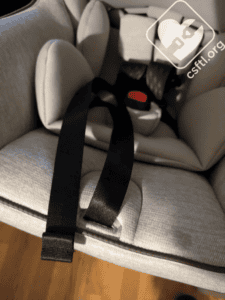
The other small challenge is the harness — it ships with the webbing attached to itself. Just grab the tail end of the webbing and release it.
It Rotates
I’m going to be honest here (when am I not??) — I’m struggling to find a problem where a rotating infant seat would be the best solution. The Peri’s website focuses on reducing back pain as a feature of this seat. However, the seat itself is almost 9 pounds with the canopy and inserts. It wouldn’t be a reach to suggest that a 9 pound carrier could contribute to back pain over time. Note: there are many carriers in this weight range on the market, the Peri isn’t the only 9 pound carrier in town!
If families are loading the child into the carrier inside the house, then carrying them out to the car, putting the carrier onto the base is the final step in the process. The Peri adds a bit of convenience by letting the caregiver load the carrier directly into the base without needing to turn the carrier to meet the contact points on the base. However, actually getting the carrier into the base proved to be more challenging than it should be (we’ll talk more about that later!). I’d suggest that the Peri’s big advantage is for caregivers who might have trouble twisting (think moms who have c-sections or caregivers with hip or abdominal issues.
Unique Features that are not Rotating
Maxi-Cosi ClimaFlow cooling
The Peri isn’t a one trick pony when it comes to features. The base includes a load leg, anti-rebound bar, a lockoff, and tension indicators on the base. The carrier includes plush fabrics and a giant canopy. The carrier also has a cooling feature.
Harness Setting for Smaller Infants
Maxi-Cosi Peri smallest harness loops setup part 1
While we want to be sure that you know this setting exists, I can say without exaggeration that it’s oddly difficult to set the harness up for use in this configuration. Please note that our 4 pound preemie doll fit very well in this seat with the inserts in place, please, for yourself and your sanity, try that first if you’re bringing home a 4 pound kiddo.
Maxi-Cosi Peri smallest harness loops setup part 2
If your 4 pound kiddo still has too much slack in the harness, there is a second set of harness loops that will make the harness smaller and should help with the fit. Accessing it and moving the harness is far more difficult than it should be.
Maxi-Cosi Peri smallest harness loops setup part 3
Please allow some time to work through these steps before trying to load an actual tiny baby into this car seat.
The bold words are taken directly from the instructions. Anything not bolded is from me.
Undo buckle and chest clip
Undo fasteners on seat pad
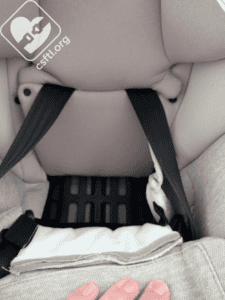
Locate foam under the seat pad
Maxi-Cosi Peri smallest harness loops setup part 4, removing the foam
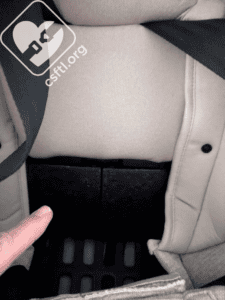
Remove foam pad. I’m going to stop you right there, Maxi-Cosi, and question why requiring parents of new, tiny babies should be tasked with removing foam padding from the seat. Also, there are two different foam pads underneath the seat pad — these instructions refer to the foam pad that’s below the baby’s bottom and is easily removable once you can access it. The foam pads behind the baby’s back that are VERY hard to remove? Those should stay in place.
Maxi-Cosi Peri smallest harness loops setup part 5, removing the harness from the splitter plate
Unloop harness strap from clip. First of all, unloop is not a verb. It’s an adjective so it’s not being used correctly here. Second of all, is this really the clearest way to explain something to new parents who are likely stressed as they struggle to configure their car seat for a tiny baby??
I digress and I also pause to encourage caregivers who need this setting to take their time while following these instructions. What this particular instruction means is remove the harness from the clip (usually we’d call this a splitter plate but usually it’s behind the baby’s back, not under their legs).
Maxi-Cosi Peri smallest harness loops setup part 6, moving the harness to the smaller set of loops
Attach 2nd set of harness loops. This is the smaller harness setting. Once the harness is in this configuration, I found it impossible to get the clip to lay flat because the harness loops made it stick out.
Maxi-Cosi Peri smallest harness loops setup part 7, attempting to reattach the splitter plate to the carrier
Replace foam pad and check buckle. Make sure the crotch buckle is in the right position.
Maxi-Cosi Peri smallest harness loops setup part 8, preemie doll in the seat!
Once we moved the harness to these inner loops, our 4 pound preemie doll had a much better fit in the seat. That’s great news but the road to that great fit was, without exaggeration, the most difficult inner harness loop setup I’ve ever encountered.
Checking Harness Tension
Maxi-Cosi Peri checking for harness tension
The manual states that the best way to check for harness tension is to unfasten the harness covers then do the pinch test. Putting the harness covers back on afterward is implied but not stated. While I can see the value in stating this, it’s also the only time I’ve seen such an instruction.
Our friends at Maxi-Cosi explained that this requirement allows better access to the harness during the pinch test. While I don’t disagree, this requirement adds an usual step that many caregivers are unlikely to follow.
Recline Angle Adjustment
Maxi-Cosi Peri recline angle adjuster
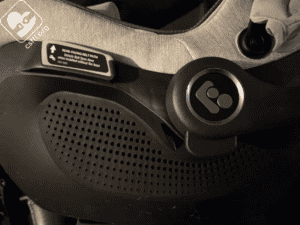
The Peri has 5 recline positions. The manual requires that the level line be level to the ground when the seat is used for children who cannot sit upright unassisted. The Peri can be installed more upright when the child can sit up without assistance.
To adjust the recline angle, squeeze the recline handle on the back of the carrier (it’s not on the base) and push back on the top of the carrier. Reverse that process to make the seat more reclined. This is completely different than any rear facing only car seat that I’ve worked with. Caregivers who choose the Peri as their very first car seat ever will not have the challenges that I faced when figuring out how to use this adjustment.
Attaching the Carrier to the Base
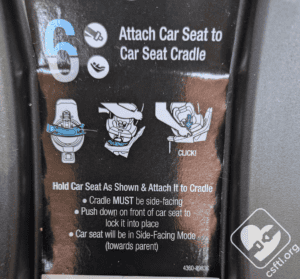
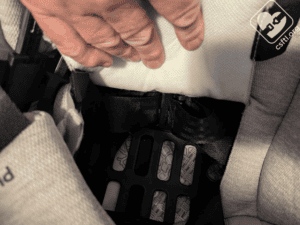
Maxi-Cosi Peri attach carrier to base
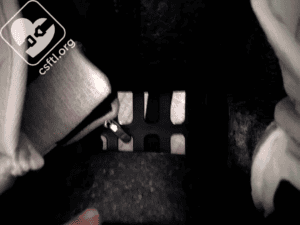
Rear facing only car seats that do not rotate are pretty foolproof when it comes to attaching the carrier to the base — it tends to be a matter of lining the carrier up with the base, then placing the carrier in the base. Even if the carrier isn’t perfectly aligned with the contact point in the base, the carrier will usually drop into the right place on the base.
The Peri is a bit different since it rotates and has the giant arm on the base. The carrier must line up exactly right with the exact spot on that arm or it won’t stay connected to the base. I’ll also note that the arm on our Peri’s base doesn’t lock into place when it’s rotated so that adds an additional challenge to something that’s usually quite easy.
The biggest trick to this part of the process is making sure to attach the REAR of the carrier to the arm (the manual calls it a cradle but we find that a little confusing so we’ll say arm now and forever) first, then attach the front part of the carrier to the arm. While I was writing this review, a caregiver in our Facebook group had some trouble with these steps — they were attaching the front of the carrier first. It turns out that doing this leaves the rear of the carrier pretty much unattached to the arm.
The manual has a short instruction around this but I can see how that’s an easy thing to miss. There’s a label on the carrier but it’s the same color as the base so it’s not easy to see. We’d like to see a VERY LARGE label in a bold color alerting caregivers to this requirement because it’s super easy to get it wrong.
So, to sum it up, attach the rear of the carrier first when you’re putting the Peri into the base.
Harness Pads
Our model included some plush harness covers. They remove quite easily and the manual says they’re optional but we’re a bit confused by the last message in the manual on this — it says that “the bottom part is not removable” but there doesn’t appear to be a bottom part.
Installation with the Base/Requirement about Touching the Vehicle Seatback
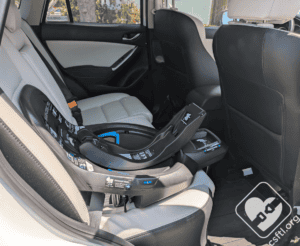
First things first, families who purchase this seat are probably doing so because the carrier rotates in the base. We’ll cover installing this seat without the base but we’d assume that it’s a pretty rare scenario for this particular seat.
This seat has the following requirement:
When using the passenger and driver side locations, when possible, the car seat MUST be touching the back of the (vehicle) seat in front of it. The manufacturer has clarified to us that this requirement is just a light touch. In their testing, this light bracing didn’t interfere with the carrier rotation. We’d like to see this light touch clarification in every manual so it’s abundantly clear to caregivers.
This is a new requirement for all Dorel (Maxi-Cosi’s parent company) car seats. Confession: the CPST world is struggling with this new rule since there are many situations where this type of bracing isn’t possible.
I honestly don’t understand how you’d do this with a rotating car seat. You’d have to move the vehicle seat in front of the car seat up while attaching the carrier to the base, then rotating the carrier into position. Once that’s complete, you’d then need to move the vehicle seat back so it’s touching the carrier. Again, the manufacturer didn’t have issues with this during their testing but we did struggle to get our carrier into place.
Set up the Load Leg
If your vehicle allows the use of load leg, flip the base over and remove the load leg from its storage position and extend it away from the base. Flip the base back and press the button on the load leg to extend it toward the vehicle floor. Continue your installation with the lower anchors or seat belt. The load leg must be perpendicular to the vehicle floor when your install is complete.
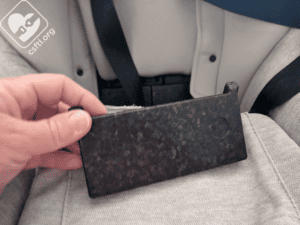
Largest Tag Ever
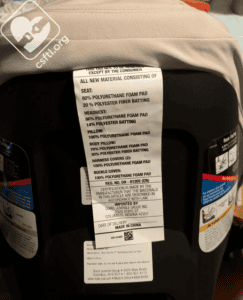
Maxi-Cosi Peri soft goods label
The Peri includes an absurdly large (but probably required in order to meet some regulation) tag that hangs outside of our Peri’s carrier, it’s so large that it hangs halfway down the back of the carrier. It also flaps mightily when I drive with the windows down. This tag can be tucked into the cover, it must be visible when the seat is imported into the United States but can spend the rest of its useful life hiding.
Lower Anchor Weight Limit?
In almost all cases, rear facing only car seats do not have lower anchor weight limits because the seat is outgrown before those weight limits would be reached. However, our Peri included a manual that lists a 25 pound lower anchor weight limit. We confirmed with Maxi-Cosi that this is actually a misprint. They sent us an updated manual dated 4/24 that does not include such a limit. Should your Peri have this limit listed, we’d suggest contacting Maxi-Cosi.
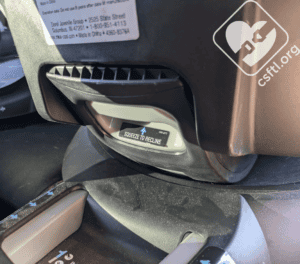
Lower Anchors
Maxi-Cosi Peri lower anchor instruction
Both the manual and the label on the base instruct caregivers to “weave the lower anchor belt in and out of the belt path” but…I couldn’t find any way to do that. The lower anchor belt path is pretty straightforward and does not appear to require weaving — the lower anchors go OVER the closed lockoff. The label on the lockoff says “Vehicle Seat Belt” so it’s mostly clear that the lockoff remains closed when the base is installed with the lower anchors. The vehicle seat belt path requires a little bit of weaving (we might call it threading) so I wonder if this reference is just a confusing oversight.
Maxi-Cosi Peri lower anchors
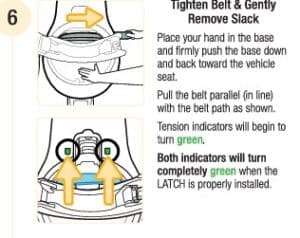
Remove the lower anchor connectors from their storage location on the bottom of the base. Make sure the lockoff is closed — it’s only for vehicle seat belt installations. The manual suggests extending the webbing all the way before starting to install the Peri’s base with lower anchors. That’s never a bad idea!
Attach the connectors to the lower anchors in the vehicle, then place one hand on the base and press down while pulling the webbing until it is snug. Repeat the process if needed until the base is secure enough that it moves less than an inch at the belt path. The tension indicators on the base will turn green when the installation is secure. Confirm your install by giving the base a firm handshake at the belt path — it should move no more than an inch.
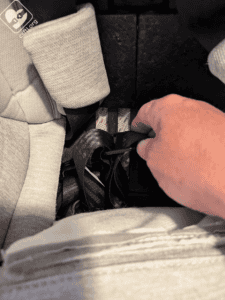
Storing the Lower Anchors
The lower anchors each store in a cubby on the front of the base. The webbing isn’t stored in those cubbies, it’s just sort of hanging out across the front of the base. I mention this because having that webbing exposed leaves it open to the elements — we’d prefer to see it tucked away somewhere on the base.
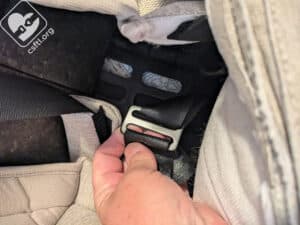
Installation with Vehicle Seat Belt
Maxi-Cosi Peri vehicle seat belt
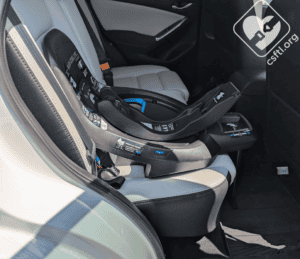
The Peri includes a lockoff that’s for use with the vehicle seat belt only. Flip the base over and remove the load leg from its storage location. Flip the base back over and open the lockoff. Thread the vehicle seat belt through the lockoff and press down on the base while pulling the shoulder portion of the vehicle seat belt tight. When the belt is snug, close the lockoff, the tension indicators on the base will turn green when the installation is secure. Confirm your install by giving the base a firm handshake at the belt path — it should move no more than an inch.
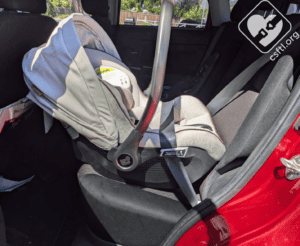
Installation without the Base
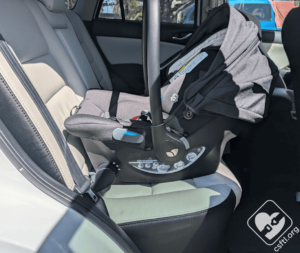
Maxi-Cosi Peri installed without the base
The carrier does not have euro routing — when the carrier is installed without the base, the shoulder portion of the belt will lie flat against the back of the vehicle seat. Given the Peri’s price point and the way it’s marketed as a higher end seat and the mention of “taxi-friendly” installation, I would have expected to see euro routing since that’s a feature we typically see on higher end car seats.
To install the Peri without the base, set the carrier on the vehicle seat with the harness facing the back of the vehicle. Thread the lap portion of the vehicle seat belt through the belt guides on the carrier and buckle. Press down on the carrier while pulling up on the shoulder belt to remove slack. Once the seat is secure, pull the vehicle seat belt all the way out until it clicks, then feed the shoulder belt back into the retractor until the carrier moves less than an inch at the belt path.
Fit to Child
Preemie Doll with the harness on the larger set of loops
With Inserts
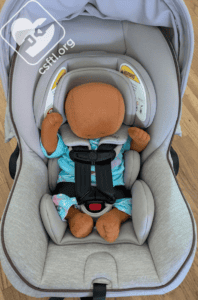
Maxi-Cosi Peri smallest harness loops setup part 8, preemie doll in the seat!
Our 4 pound, 17 inch Huggable Images doll doesn’t fit particularly well into this seat. There’s some extra slack in the harness no matter what we do.
Without Inserts
Maxi-Cosi Peri checking for harness tension, preemie doll on larger set of harness loops
Since the fit wasn’t great, it only makes sense that we try the fit on our preemie doll without the inserts. It was worse.
Preemie Doll with the harness on the smaller set of loops
With Inserts
Maxi-Cosi Peri checking for harness tension, preemie doll on smaller set of harness loops
We went through the Great Ordeal — moving those harness straps to the smaller setting — and put our preemie doll back to work modeling the seat. In this configuration, the doll fit pretty well. Was it worth the effort to move those harness straps? I don’t know.
Without Inserts
Newborn with the harness on the larger set of loops
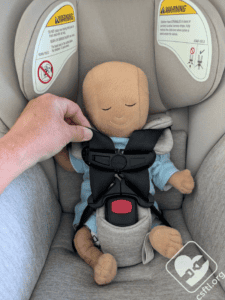
With Inserts
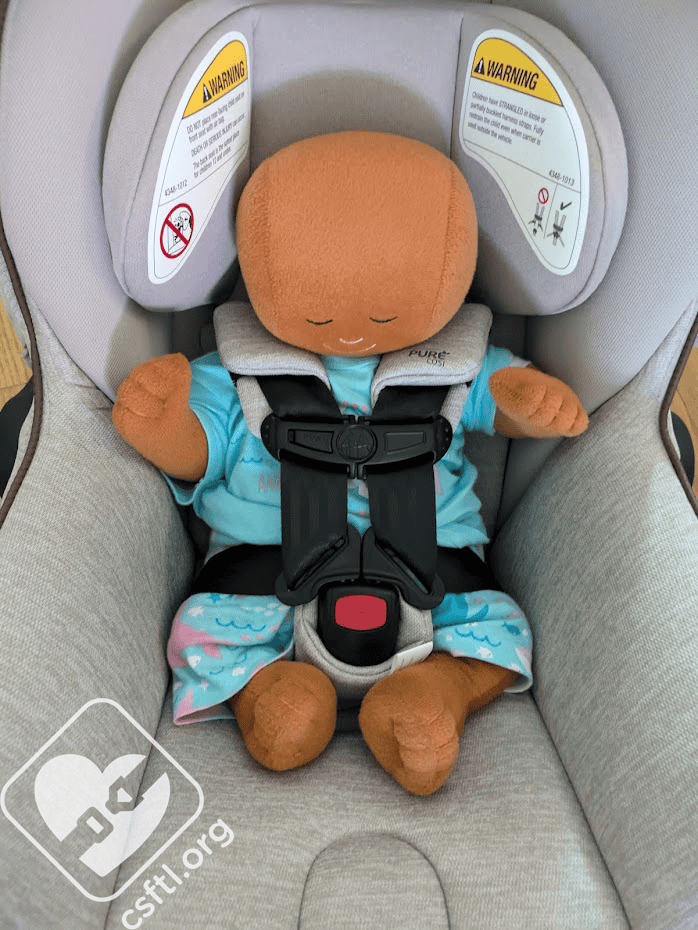
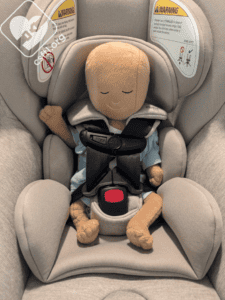
Maxi-Cosi Peri newborn fit
Our 7 pound, 17 inch long Huggable Images newborn doll reports that the Peri is quite comfortable, and we observed that the doll fits quite well.
Without Inserts
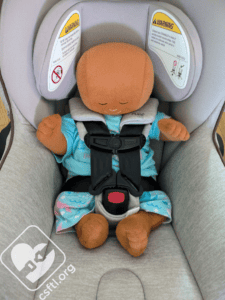
Maxi-Cosi Peri newborn without inserts
Our doll also fit pretty well without the inserts.
Important Information: Where to Find
Maxi-Cosi Peri date of manufacture label
Date of manufacture label: the label is located on the back of the base. The Peri has an 8 year expiration.
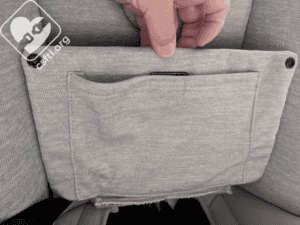
Maxi-Cosi Peri manual storage
Manual storage: the manual stores in a pocket on the underside of the carrier’s cover, behind the child’s back.
FAA approval: the carrier is approved for use on aircraft with the following caveat: “This restraint is certified for aircraft use when used with the internal harness.” Since the Peri is a rear facing only car seat, there’s no scenario where that harness is removed so this is pretty confusing. The label is located on the back of the carrier and has a little airplane so it’s easy to identify.
Overall Thoughts
I’m absolutely a sucker for car seats with plush fabrics and in that regard, the Peri delivers. The harness is easy to adjust and the carrier fit our newborn model quite well. If for some reason, a family bought the Peri with the intention of using it without the base, I think they’d have a fine option here.
However, I’m really struggling with why the world needs a rotating rear facing only car seat, especially one like the Peri where it’s unfortunately pretty challenging to get the carrier into the base correctly. The requirement of the vehicle seat back needing to touch the car seat (when possible) makes the Peri almost impossible to use correctly. We would unfortunately suggest that families consider other options before choosing the Peri.